GOLD Hedging Contract V2
MetalSwap Mainnet
Wallet introduction and settings
Welcome to the MetalSwap operating Dapp interface on ETH Mainnet, where financial
Hedging Contract can be preformed.
To access the Dapp click on the "LAUNCH APP" button on the top right corner.

Now you are on the MetalSwap dApp page, used to create Hedging Contract positions.
The MetalSwap Hedging Contract Dapp is ready to be set up.
First of all is fundamental to have or install a Digital Wallet (MetaMask / Sec. Wallet ) as a browser extension.
We recommend using browsers such as Chrome, Firefox or Brave.
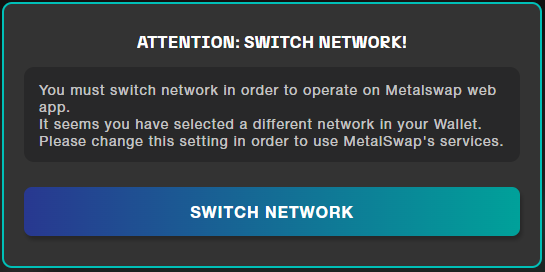
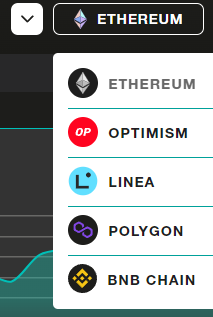
Select now the Ethereum Network on Metamask otherwise this warning will appear.
After selecting the right network, click on 'Connect Wallet'.
Application interface
From now on the Dapp is ready to be configured.
-Select the WPAXG
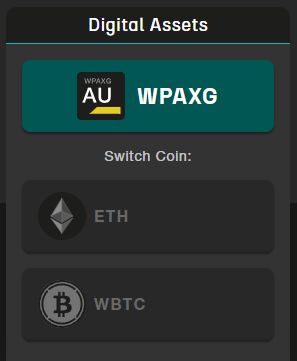
⚡WPAXG
PAXG is a fee-transfer token.
For each PAXG on-chain transaction, PAXOS charges an additional fee of the amount of PAXG sent.
MetalSwap’s Hedging Contract were not designed to be used with fee-transfer tokens.
In order to solve this issue, the proposal was to create a WRAPPED ERC20 token from PAXG, called WPAXG. This allows $PAXG holders to lock them into the Smart Contract to mint and use $WPAXG.
So, to be able to use $PAXG , we need a Wrapped version of it.
To better understand all the steps that led to use WRAPPED PAXOS GOLD you can read all the detailed explanation on this Medium Article.
2 ways to obtain WPAXG token:
- Having PAXG: Wrapping it through MetalSwap’s official Synthetizer tool, in the main menu of the MetalSwap website

Click on it and this tool will appear allowing to Wrap and unWrap PAXG tokens to WPAXG.

MetalSwap’s official Synthetiser tool — Wrap and unWrap PAXG
- Not having PAXG: Swapping any token directly on UniswapV3 for WPAXG, the wrapped version of PAXG corresponding to the following Token Address: 0x787c68f6bCAb352Ec871C522d038bc7A30268020
You can also use the UniV3 backend with MetalSwap’s frontend, by selecting “Exchange” section from “Tokens” in the top navbar.
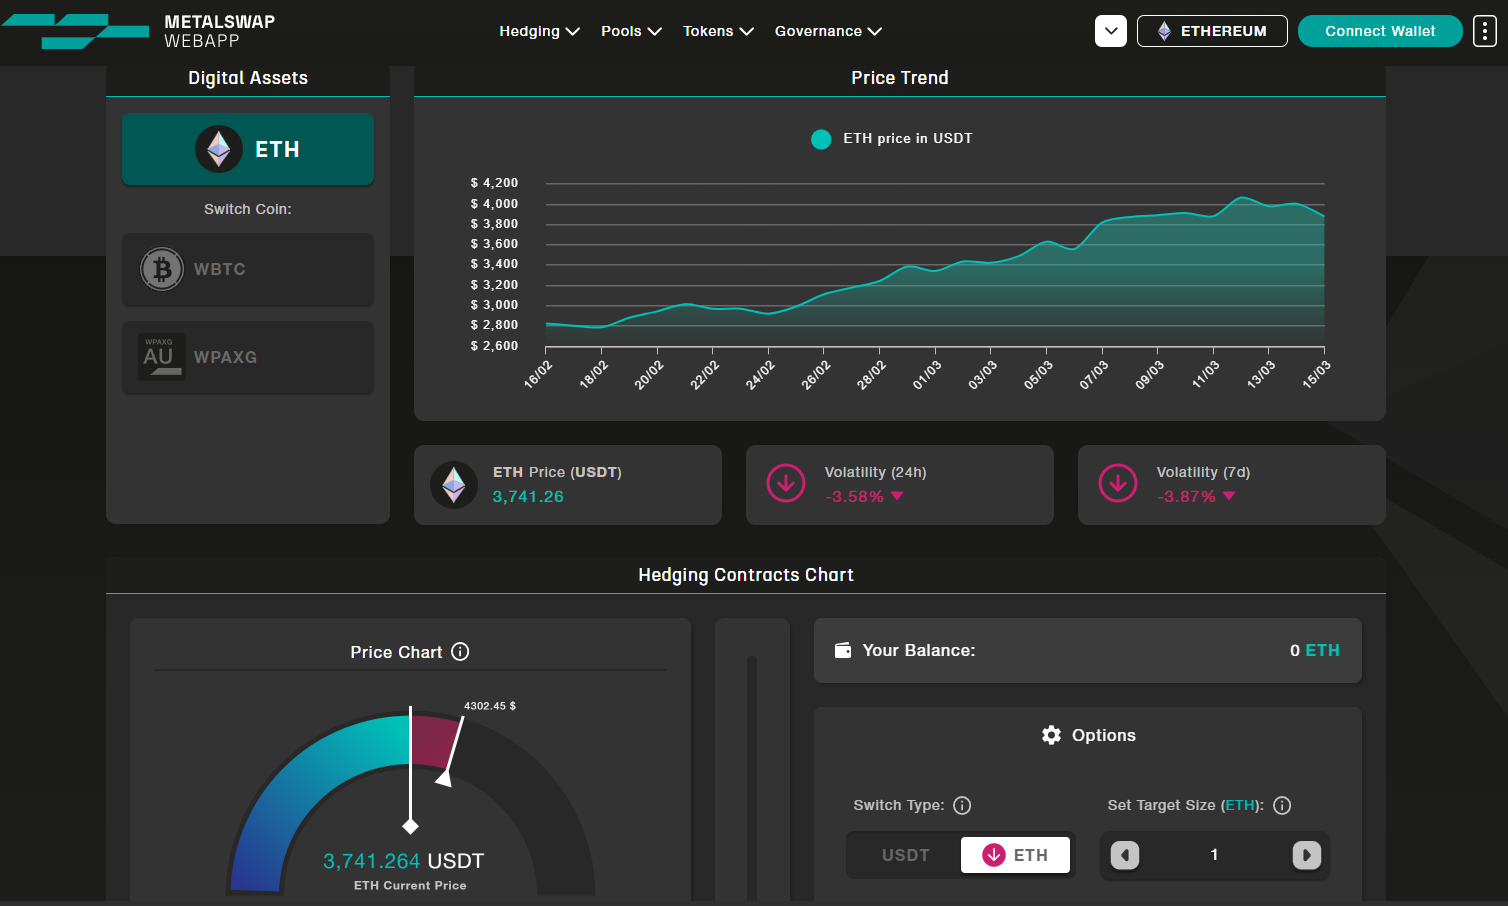
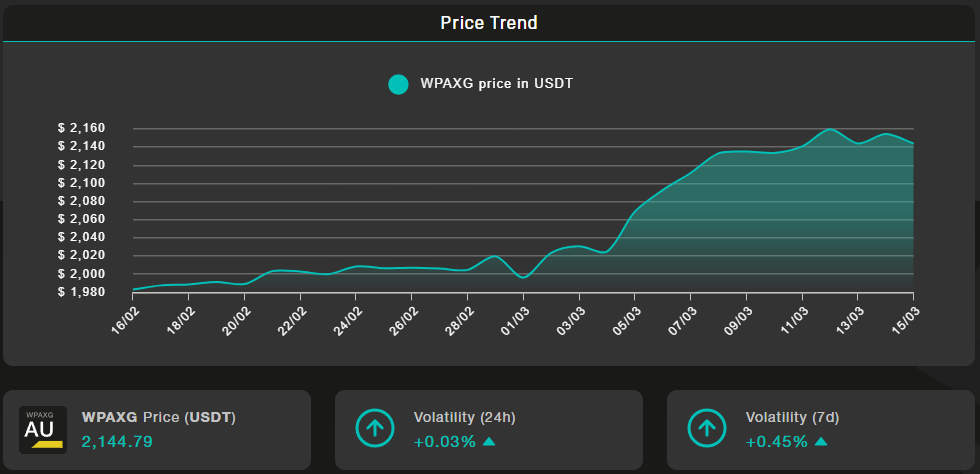
The PRICE CHART shows the current PRICE and the VOLATILITY (24h and 7day time frame) of the Digital Asset previous selected and the graph shows the price trend.
Operating console
The rainbow graph in the console, on the left side, represents the result of volatility management: green is the hedged position bringing profits, red is the cover eroding direction.
Just below is reported the Current Price of the chosen Digital Assets, the Threshold and the Premium to pay as a fee necessary to open the Swap.
Please note: the Threshold is set by the user. When the price of the asset exceeds this level, the Hedging Contract will be closed automatically and Liquidated. It is possible to change it at any time, even when the Hedging Contract is already open.
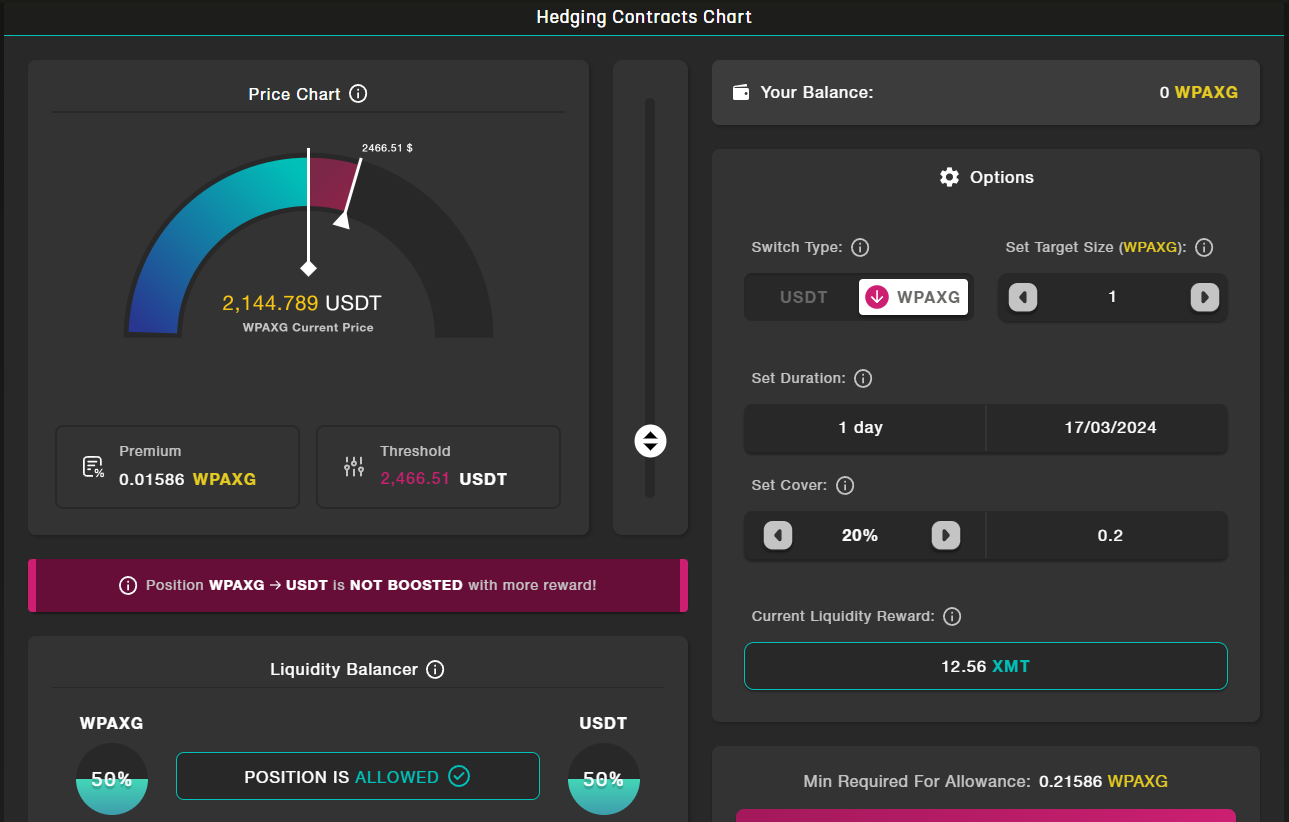
The central slider is used to change the Cover percentage, consequently the Threshold value.
To the right, of the operating console, is where the data needs to be input:
-
Target Size: is the quantity of Digital Assets on which to apply the Hedge.
-
Expire date: is the closing/expiring date of the Hedging Contract.
-
Cover: is the percentage of Target Size used to cover the open position.
-
Liquidity reward: The amount of $XMT recognized from opening the Hedge.
The user receive the $XMTs if the Hedging Contract Position closes on the Expire Date; if for any reason it closes earlier the platform is giving the $XMTs amount proportional to the time the Hedging Contract Position was open.
On the first set up, click the "Allowance" button to grant permission to the smart contract to spend the XMT tokens.

Important to know
MetaMask now requires you to set your spending cap, which is the number of tokens you're comfortable with the Smart Contract spending now or in the future.
- To avoid repeating this process, it is recommended to click on "USE DEFAULT" button. This ensures that you won't have to give an additional allowance when the previously entered number has been reached.
- Enter the desired value for your spending cap.
- Click on "NEXT" to proceed.
- Pay the transaction fee associated with the confirmation.

After setting the desired values in the appropriate sections, proceed by clicking on the "CREATE" button to open the Hedging Contract position.
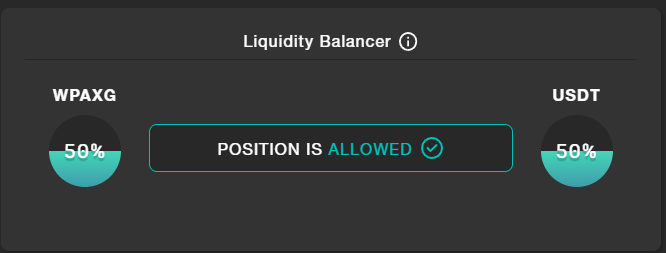
The Liquidity Balancer section represents the percentages of Hedging Contract position open based on the Target Size for both directions. All the position opened that tends to balance the Balancer are incentivised by increasing the amount of Liquidity Reward received.
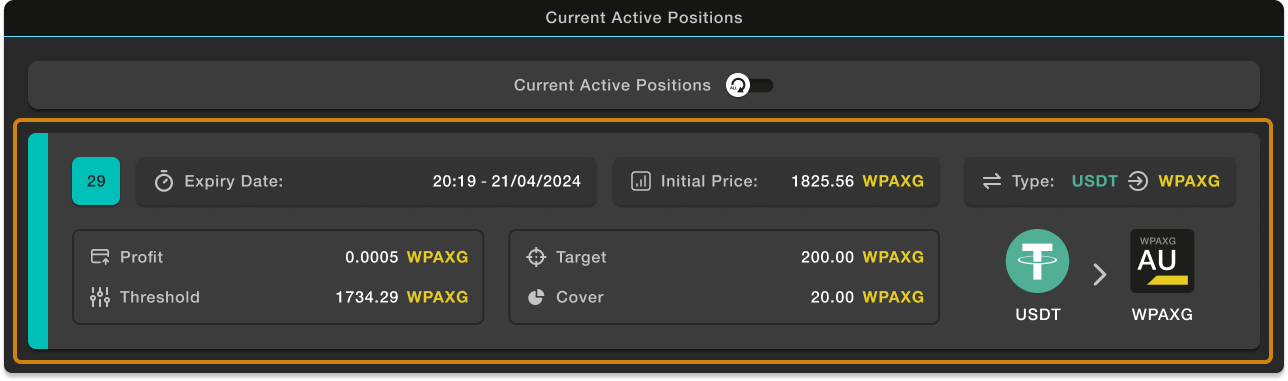
All the active Hedging Contract position are visible at the end of the page in a Current Active Position section.

Is possible to view all the Hedging Contract position no longer active by clicking on "History" in the main menu.
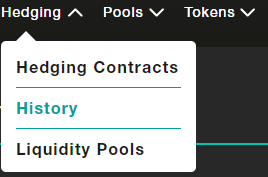
In this section there are:
- Executed : all the Hedging Contract position that have reached the expire date without having crossed the Threshold.
- Closed : all the Hedging Contract position closed manually before the expire date.
- Liquidated : all the Hedging Contract position that have crossed the Threshold.

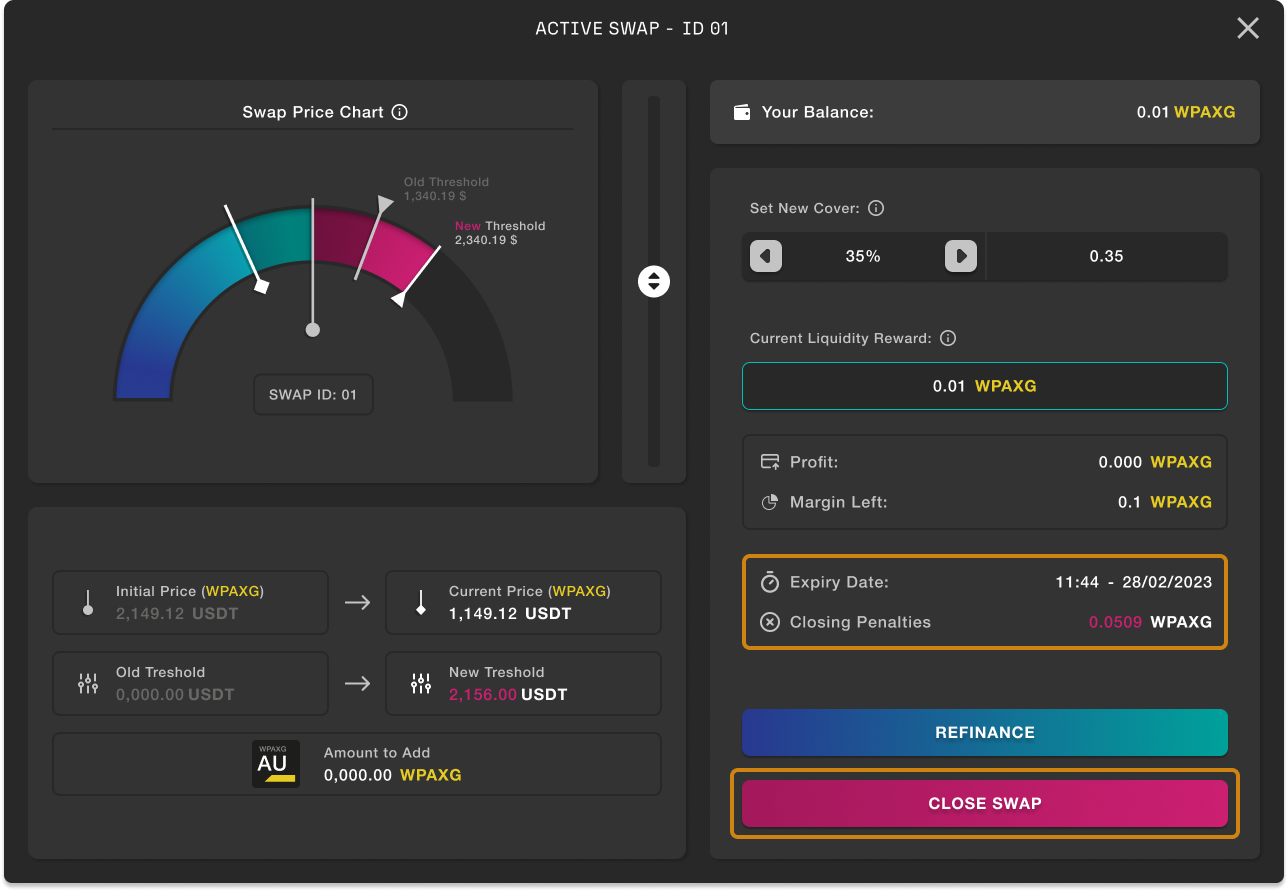
To manage an active Hedging Contract position, just click on it to open the data relating to its position.
For example, If the user wishes to increase the Cover, simply has to raise the desired percentage with the cursor and click on the "Refinance" button to confirm it.

To close the Hedging Contract position early, click on the “Close” button.
In this case there is a penalty to pay indicated under “Closing Penalties” and the user will receive the Liquidity Reward proportional to the time that the Hedging Contract position was open.
For all the use cases examples, read the articles on the medium site in the MetalSwap Blog.